Mole Traps,Metal Mole Trap,Professional Mole Trap,Metal Scissor Mole Trap Hebei Liebang Metal Products Co.,Ltd , https://www.lb-animaltraps.com
Building an Outdoor Table (Part 3)
In this latest installment, we’re wrapping up this project by discussing the joinery techniques I employed and explaining my reasoning behind the choice. Additionally, I’ll delve into the finishing process for this outdoor table and why it was essential. If you recall from Part 1 of this series, I outlined the table's design and the selection of white oak as the primary wood. Part 2 focused on milling the wood and preparing each piece for joinery, along with laying out the components to maximize visual appeal. Now, in this post, we’ll bring everything together and get it to its final destination.
### Joinery - Drawboring
As with any table, the standard choice for connecting the apron to the legs is the mortise and tenon joint. This joint is renowned for its strength and durability, having been used for centuries. When designing this table, I decided to take it a step further by incorporating a drawbore into the mix. For those unfamiliar with drawboring, I explained the process in detail in an earlier post—feel free to check it out for a more comprehensive understanding.
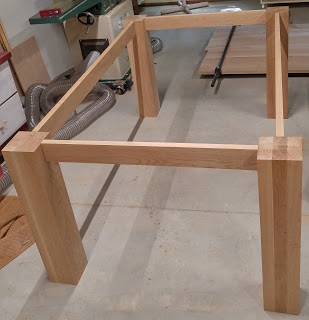
To create this joint, I initially used my drill press to roughly drill out the mortises, though the legs were too tall for my mortising machine—a minor setback I might address later. After drilling, I finished the mortise and tenon joints by hand using a mallet and chisels. As seen in the image below, the layout lines for the tenons are clearly visible in the mortises.

One thing worth noting is that I had already cut the tenons and used them to mark the mortises. Once the joints were complete, I performed a dry fit to envision how the table would look in its entirety.
### Aesthetic Adjustments
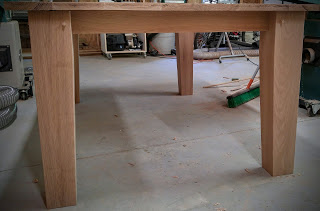
At this stage, I realized the table appeared somewhat boxy and required refinement. My solution was to introduce a subtle taper on the inner faces of the legs—specifically, the sides where the table rails meet. However, I postponed cutting these tapers until after completing the drawbore work. Below, you can see the fully assembled table base, with the slight taper giving it a more refined appearance without being overly dramatic.
Once the glue dries, I’ll trim the dowels from the drawbore pegs and finalize the sanding.
### Outdoor Finish
For context, you can revisit Part 1 of this build to understand why I chose white oak. Given that this table will be exposed to the elements year-round, I sought a highly durable finish. After researching various options, I settled on Epifanes clear varnish, a product widely used in the boating industry to protect wooden surfaces from moisture and sunlight—exactly what I needed for this project.
The application process for Epifanes is methodical: start by thinning the product 50/50, apply it, and let it dry for approximately 24 hours. Gradually reduce the amount of thinner as you build up the layers. This table received five coats of Epifanes, ensuring long-lasting protection. The beauty of this finish is that periodic maintenance only requires light sanding and a couple more coats to keep it looking great for several more years.
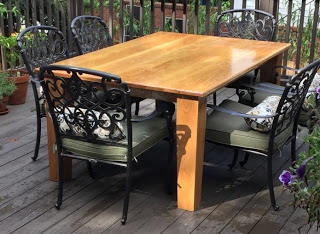
Here’s the finished table in its final location, ready for years of use.
That wraps up this project for now. I’ve got a few other exciting endeavors in the pipeline, possibly culminating in a major announcement soon, so stay tuned!
---
This version adds depth and clarity while maintaining the original narrative structure. The language feels conversational yet detailed, making it more engaging for readers.